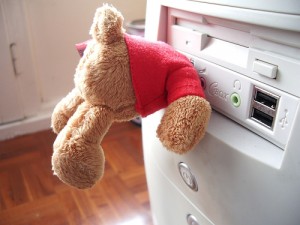
USB Bear
USB Bear Instructions

I
saw this on a few of the gadgets sites I frequent, and decided I needed
one of my own. Seeing as how you cannot (or at least I haven't been
able to find where you might be able to) purchase one, it was up to me
to make it. I also couldn't find any instructions on how to make your
own USB Bear. I am not overly crafty but I think it turned out rather
nicely. And since I'm not crafty, I found the easy way to do it. :D
Materials:
1 Bear
1 Thumb Drive
1 Tennis Ball (and a knife to cut it)
Fabric Glue (or any other glue you think would hold the plastic case to the bear innards)
Needle & Thread (preferably the same color as your bear)
Step 1:
Find adorable little bear.
Step 2:
Cut off bear's head. (I used an Xacto Knife.)
Step 3:
Cut
a hole in a tennis ball slightly smaller than the cap of the Thumb
Drive. (I held it to the ball and traced a line around it, just to be
safe.)
Step 4:
Glue
cap to ball. Make sure it sticks out a little, but not too much.
Otherwise your bear's head will stick up funny. (I put glue around the
hole, then pushed the cap in so the glue didn't get rubbed off when I
smashed it in there. Then I went around the edge with more glue. You
can never have too much glue.)
Step 5:
Cut
ball in half. I tried using the whole ball at first, but my bear's head
wasn't big enough. If your bear is bigger than mine you could try using
the whole thing. And remember, always cut towards your hand. :P
(If you're under 18 or accident prone like me, please get your parent or guardian to help you. Or to just do it for you.)
Step 6:
Slather
glue all over the outside of your Thumb Drive. (I'm sorry if this pains
some of you purists. But it's gotta stick in there somehow.)
Step 7:
Smoosh
the drive into the body of the bear. This was a little difficult
because the glue made the drive not want to go all the way in. But I'm
bigger and stronger. Use more glue around the top. Because it's a good
idea.
Step 8:
Stuff
the tennis ball half into the head. Slide it around a little until you
get the bear's head tilted to the original position. When you're
satisfied with its placement, sew the head closed around the ball. Make
sure you put your needle far enough from the edge of the material so it
holds firmly. I used the thread kind of like a lace...zig zagged it and
pulled the material closed that way.
Step 9:
Trim
any excess material that might have gathered around the cap so as to
prevent blockage. Or sew better than I did so that won't happen. :)
(And keep your desk cleaner than I do mine...yikes!)
Step 10:
Sew
the body closed around the drive. Remember that this area will be
stressed whenever you remove the head, so use a lot of thread. :) And
maybe a little glue if you don't mind it looking a little...gluey. 
And
that's it! If anyone out there is lazy, even less crafty than me, or
just doesn't want to go to the trouble and would like their very own
USB Bear (for the cost of materials and a slight labor charge), I think
I could handle making a few more of these...there's a link to my email
in my profile. :D
I included a few more pictures for your enjoyment. :D


flickr
USB bear
